|
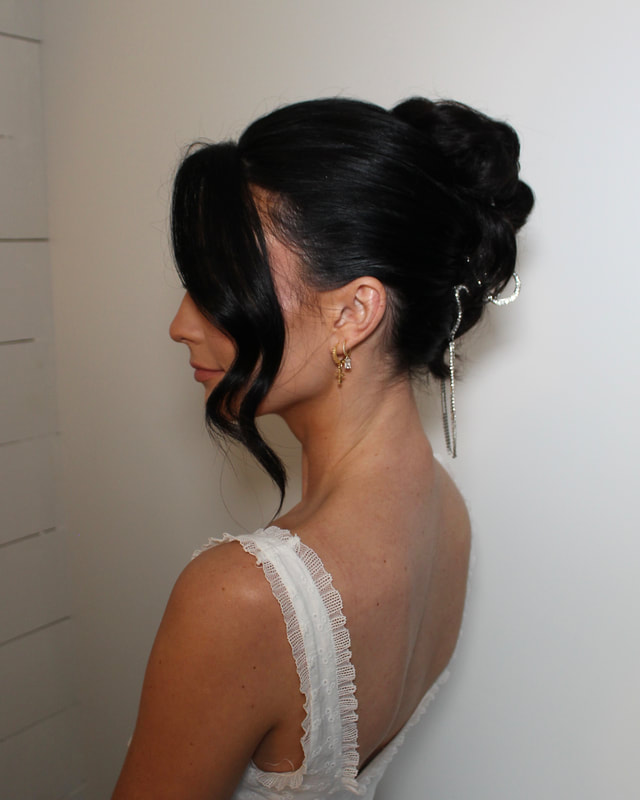
The foundation of a great hairstyle is always the prep and that starts before the time of your appointment. These tips will help me to create the gorgeous style you dream of!
0 Comments
Are you overwhelmed with how much there is to do before the wedding and not sure when you should be doing it all?? Here is a simple guide for the timing of your beauty planning! 12+ Months: Every artist is different with how far they book out but my suggestion is that as soon as you know your date, reach out to your favorite vendors to see if they have your date available/are booking that far out yet. It’s never too early! 9+ months: Start working with your salon stylist to figure out the schedule you will follow to have the perfect cut and color to suit your wedding hairstyle. Same goes for your esthetician! If you have bigger skin concerns (acne, acne scarring, discoloration) you may need to start sooner than 9 months. 6+ months: Again, never too early to ask for a date if you have a specific one in mind but I usually recommend reaching out about 6 months out, to set your preview appointment, 2-3 months from wedding day. Before your preview appointment: Using your artist’s portfolio, find images that fit the vibe you are going for. Don’t save more than 3-4 images per service, to avoid getting overwhelmed. 3ish months: Bridal Shower Glam! Why not look your most beautiful for your bridal shower as well? 2-3 months: I like doing preview appointments about 2-3 months from the wedding so you look pretty similar to how you will on the wedding day, ** Don’t forget to book your artist for your rehearsal dinner glam too! This is one of my favorite appointments because the look can be more “fun and flirty”! ** There are several clothing items any hair stylist hates to see their clients wearing when it comes time for their appointment (if they’re not planning to wear this item for the rest of the day).
Alternative Styles I love: Tank tops, robes with no collar and not fluffy, silky rompers. If your girls tend to get cold, opt to get them a fleece blanket as part of their gift or have them bring their own! Exfoliation is a great thing to do leading up to your makeup appointment but I don’t suggest any physical exfoliation within 24-48 hours of your makeup application, ESPECIALLY if you’re experiencing inflamed acne. Physical exfoliation can cause micro-tears or injuries to the skin so by avoiding them within a few days of your big event, you’re less likely to experience the inflammatory response.
𝚆𝚑𝚊𝚝 𝚒𝚜 𝚌𝚘𝚗𝚜𝚒𝚍𝚎𝚛𝚎𝚍 𝚊 𝚙𝚑𝚢𝚜𝚒𝚌𝚊𝚕 𝚎𝚡𝚏𝚘𝚕𝚒𝚊𝚝𝚒𝚘𝚗: 🧽 𝙿𝚒𝚖𝚙𝚕𝚎 𝚙𝚊𝚝𝚌𝚑𝚎𝚜 🧽 𝙳𝚎𝚛𝚖𝚊𝚙𝚕𝚊𝚗𝚒𝚗𝚐 🧽 𝙵𝚊𝚌𝚒𝚊𝚕 𝚜𝚌𝚛𝚞𝚋𝚜 🧽 𝙼𝚒𝚌𝚛𝚘𝚍𝚎𝚛𝚖𝚊𝚋𝚛𝚊𝚜𝚒𝚘𝚗/𝚑𝚢𝚍𝚛𝚘𝚍𝚎𝚛𝚖𝚊𝚋𝚛𝚊𝚜𝚒𝚘𝚗 🧽 𝙵𝚊𝚌𝚒𝚊𝚕 𝚜𝚌𝚛𝚞𝚋 𝚋𝚛𝚞𝚜𝚑𝚎𝚜 (𝚊𝚌𝚝𝚞𝚊𝚕𝚕𝚢, 𝚍𝚘𝚗’𝚝 𝚞𝚜𝚎 𝚝𝚑𝚎𝚜𝚎 𝚎𝚟𝚎𝚛) Pimple patches remove layers of skin, like other forms of exfoliation, but in this case, the skin removal is in a targeted area. Because of this, there is a visible line of delineation around the area where the patch was and it can be hard to cover this with makeup as it is a textural issue. It is easier to cover a pimple with makeup that has not been “messed with”. This includes, picking, popping, even looking at for too long since sometimes that can even piss the little guy off LOL 𝙾𝚔𝚊𝚢, 𝚢𝚘𝚞 𝚌𝚊𝚗’𝚝 𝚖𝚎𝚜𝚜 𝚠𝚒𝚝𝚑 𝚊 𝚋𝚛𝚎𝚊𝚔𝚘𝚞𝚝 - 𝚜𝚘 𝚠𝚑𝚊𝚝 𝚍𝚘 𝚢𝚘𝚞 𝚍𝚘? 𝙸𝙲𝙴, 𝙸𝙲𝙴, 𝙱𝙰𝙱𝚈 - 𝙸𝚌𝚒𝚗𝚐 𝚊 𝚋𝚛𝚎𝚊𝚔𝚘𝚞𝚝 𝚒𝚜 𝚊𝚗 𝚞𝚗𝚍𝚎𝚛𝚞𝚝𝚒𝚕𝚒𝚣𝚎𝚍 𝚝𝚘𝚘𝚕. 𝙱𝚎 𝚌𝚊𝚛𝚎𝚏𝚞𝚕 𝚠𝚑𝚎𝚗 𝚍𝚘𝚒𝚗𝚐 𝚝𝚑𝚒𝚜; 𝚍𝚘 𝚗𝚘𝚝 𝚊𝚙𝚙𝚕𝚢 𝚝𝚑𝚎 𝚒𝚌𝚎 𝚍𝚒𝚛𝚎𝚌𝚝𝚕𝚢 𝚝𝚘 𝚝𝚑𝚎 𝚜𝚔𝚒𝚗 𝚘𝚛 𝚕𝚎𝚊𝚟𝚎 𝚒𝚝 𝚘𝚗 𝚢𝚘𝚞𝚛 𝚜𝚔𝚒𝚗 𝚏𝚘𝚛 𝚝𝚘𝚘 𝚕𝚘𝚗𝚐. 𝙳𝚎𝚙𝚎𝚗𝚍𝚒𝚗𝚐 𝚘𝚗 𝚠𝚑𝚎𝚗 𝚢𝚘𝚞 𝚐𝚎𝚝 𝚝𝚑𝚎 𝚋𝚛𝚎𝚊𝚔𝚘𝚞𝚝, 𝚒𝚌𝚎 𝚘𝚗 𝚊𝚗𝚍 𝚘𝚏𝚏 𝚎𝚟𝚎𝚛𝚢 𝚏𝚎𝚠 𝚑𝚘𝚞𝚛𝚜 𝚞𝚗𝚝𝚒𝚕 𝚢𝚘𝚞𝚛 𝚖𝚊𝚔𝚎𝚞𝚙 𝚊𝚙𝚙𝚘𝚒𝚗𝚝𝚖𝚎𝚗𝚝. 𝙳𝚘𝚗’𝚝 𝚜𝚝𝚛𝚎𝚜𝚜 𝚊𝚋𝚘𝚞𝚝 𝚒𝚝 - 𝚈𝚘𝚞𝚛 𝚖𝚊𝚔𝚎𝚞𝚙 𝚊𝚛𝚝𝚒𝚜𝚝 𝚠𝚒𝚕𝚕 𝚋𝚎 𝚊𝚋𝚕𝚎 𝚝𝚘 𝚌𝚘𝚟𝚎𝚛 𝚝𝚑𝚎 𝚌𝚘𝚕𝚘𝚛 𝚘𝚏 𝚋𝚕𝚎𝚖𝚒𝚜𝚑, 𝚝𝚘 𝚖𝚊𝚔𝚎 𝚒𝚝 𝚕𝚎𝚜𝚜 𝚗𝚘𝚝𝚒𝚌𝚎𝚊𝚋𝚕𝚎 𝚒𝚗 𝚙𝚎𝚛𝚜𝚘𝚗. 𝙸𝚗 𝚙𝚑𝚘𝚝𝚘𝚜, 𝚢𝚘𝚞’𝚛𝚎 𝚗𝚘𝚝 𝚐𝚘𝚒𝚗𝚐 𝚝𝚘 𝚜𝚎𝚎 𝚢𝚘𝚞𝚛 𝚋𝚛𝚎𝚊𝚔𝚘𝚞𝚝 - 𝚝𝚛𝚞𝚜𝚝 𝚖𝚎. Loose Fitting Clothes: One of our key tips for your spray tan preparation was to wear loose fitting clothing to the salon, and we recommend staying in this outfit for the remainder of the day. Select your most stylish dark, loose-fitting outfit and pair it with sandals for lowest chance of staining your clothes and the least amount of friction. Tight bras, shirts, pants, or shoes can cause lines, streaks, and indentations if worn too soon after your appointment, ruining the spray tan effect that your technician just applied.
Baby Powder is Key: Deodorants were also mentioned as something that should be avoided before your tan, and unfortunately the rest of the day after is no different. While you may just want to tough if out for the rest of the day to avoid the patchiness that both sticks and spray can cause, sweat also causes streaks and spots. We’re going to let you in on a secret industry tip; baby powder works wonders to solve both the smell and sweat problem. Apply liberally around sweat prone areas such as your underarms, inner elbows, back of your knees, and under your butt. Who says looking great, smelling great, and prolonging your tan has to be difficult? Liquids are the Enemy: The duration you should wait to shower after your tan varies depending on the level of color depth, your skin requirements, and the solution used, but six hours on average is recommended. This means that you also need to avoid rain, pools and the beach. Solutions are a tricky science, needing enough time to absorb and ensure an even shade. Keep in mind that leaving the solution on any longer than 12 hours can cause streaking as well, so adhering to their advice is important. Follow Proper Shower Procedures: When it finally is time to take a shower, there are several important things to keep in mind that may differ from your normal wash routine. First, don’t spend an excessive amount of time in the water as it may cause fading before you are even able to flaunt your tan in public. Utilizing water that is too hot can also speed up this process, so be sure the water is lukewarm before you hop in. During the first shower avoid using soaps on your skin. If you need to use soap, keep in localized to the necessary areas. Avoid washing your hair during this initial shower if you can. But, if it is absolutely critical to wash your hair, a methodical wash that avoids touching the skin is the best technique. After your shower, dab, don’t rub the towel against your skin to dry off the water. Over the next 12 hours, your tan will continue to develop before reaching its peak jaw-dropping look. Hydration for the Win: After you have taken your first shower, keeping your skin as moisturized as possible will be THE key factor affecting how long your tan will last. Prepare oil-free body lotion to use daily after your first rinse to properly rejuvenate your skin’s vital nutrients. If you don’t moisturize properly, there is a chance that your spray tan will wear off in dry patches of skin. Lotion with oil should absolutely be avoided as it will have the opposite effect of what you are trying to achieve, preventing the skin from absorbing the solution and shortening the lifespan of your tan. Oil-based fragrances, perfumes, and even products like bug spray will also have this same negative effect; meaning direct skin contact with these products should be avoided as well for the sake of your tan. Keep Exfoliation and Shaving to a Minimum: Ideal for the preparation of your skin and harmful for the preservation, exfoliation wears away at the surface of your fresh spray tan. Along with pore strips and bandages, it should be kept to a minimum until your brilliant color begins to fade away. Shaving is also a tricky subject, as it offers the same drawbacks but is much harder to avoid for 5-8 days. So, if hairy legs or armpits aren’t your thing, then be sure to shave with light pressure and an emphasis on using slow, even strokes of your razor. If done correctly, this will prevent any unwanted exfoliation and fading. Exfoliation: Dead skin cells can cause streaking and flaking after a spray tan. We suggest using physical exfoliants like body scrubs, loofahs, dry brushing, or even a washcloth every day for three days before your appointment. This will help to remove the dead skin cells, leaving your skin perfectly smooth and ready to absorb the maximum tanning solution. *It is important to note that you should not use chemical ingredients like retinol and glycolic acid at least 24 hours before your tan. These chemicals can prevent the tanning solution from absorbing in to your skin or work at exfoliating your tan too.
Shave: While shaving before your appointment isn’t obligatory, shaving up to 24 hours after a spray tan can remove the spray tan solution along with your hair. If you do choose to shave before the appointment, do it at least 24 hours in advance to allow your skin and pores to recover. Similarly, allow 24 hours between waxing and spray tanning, because this procedure will open up your pores, leaving an uneven tint. Shower: An incredibly important step in the spray tan process, we recommend showering exactly 8 hours before your appointment. This allows your body time to resume its natural pH level while at the same time offering all the benefits of exfoliation. Wear Loose Clothes and Sandals, Utilize Nail Polish: One of the most common questions new spray tan clients ask is, “what should I wear to my appointment?” We recommend wearing dark, loose-fitting clothing and sandals that will have the lowest chance of being stained. Tight bras, shirts, pants, or shoes can cause tan lines if worn immediately after your appointment, ruining the spray tan masterpiece that your technician just performed. If you plan on wearing undergarments during the spray process, be sure to wear something you don’t mind getting stained. Another insider tip is to paint your nails before your spray tan. Nail polish helps to prevent discoloration around your nails and cuticles. Avoid Makeup, Deodorant, and Moisturizer: Acting as a barrier to prevent your skin’s absorption of the spray tanning solution, makeup and deodorant should not be worn during your appointment. If you can’t go without them, bring a pack of oil-free wipes to quickly remove all substances before the technician sprays your skin. Avoid using moisturizer a few hours before you’re being sprayed too, as it will disrupt your skin’s absorption of the tanning solution. |
|